• Skip to primary navigation
  • Skip to main content
  • Skip to primary sidebar
  • Skip to footer

iBiology

Bringing the World's Best Biology to You

  • Start Here
    • Explore iBiology
    • All Playlists
    • All Speakers
    • All Talks
    • What’s new at iBiology?
  • Research Talks
    • Talks by Topic
      • Biochemistry
      • Bioengineering
      • Biophysics
      • Cell Biology
      • Development and Stem Cells
      • Ecology
      • Evolution
      • Genetics and Gene Regulation
      • Human Disease
      • Immunology
      • Microbiology
      • Neuroscience
      • Plant Biology
      • Techniques
      • Archive
    • Talks by Series
      • Bench to Bedside
      • Famous Discoveries
      • Great Unanswered Questions
      • Microscopy Series
      • Share Your Research Series
  • Stories
    • Background to Breakthrough
    • Interviews and Profiles
    • Science and Society
  • Courses
  • Careers
    • Professional Development Talks
    • Professional Development Courses
    • Career Exploration
    • NRMN Resources
    • Biomedical Workforce
  • Educators
  • About
    • Mission
    • iBiology Team
    • Board of Directors
    • iBiology Funders and Partnerships
    • Contact Us
  • Donate
Home » Courses » Microscopy Series » Fluorescence Microscopy

Super-Resolution: Localization Microscopy

  • Duration: 27:17
  • Downloads
    • Hi-Res
    • Low-Res
  • Subtitles
    • English
  • Transcript

00:00:12;06 This time we're going to talk about one category of Super Resolution microscopy method.
00:00:17;22 Now this category is the ones that are based on single molecule switching or as someone called it single molecule localization.
00:00:24;07 To understand why we can get super resolution out of a normal diffraction in Microscope
00:00:32;29 We need to start from considering the basics of fluorescent Microscopy
00:00:36;17 so in fluorescent Microscopy
00:00:39;19 We have these say some structures in the cell and we stain with fluorescent dyes
00:00:43;19 And because of the diffraction limit we have some blurry image out of these fluorescent signal from the dyes
00:00:53;24 now
00:00:54;20 We have to understand that in a cell
00:00:56;17 we never have continuous structure like this. All the structures are made of
00:01:00;22 discrete molecules and our fluorescent image consists of signal from discrete fluorophores and
00:01:08;06 With the development of the fields for single Molecule Detection in the past more than twenty years
00:01:14;00 now it's fairly routine for us to capture the
00:01:19;11 fluorescent signal from one molecule given that we have a good enough microscope and sensitive-enough camera
00:01:25;26 On the other hand even if I have just one molecule
00:01:30;04 it's still going to look blurry because of the diffraction limit in this case the red fluorescent molecule is going to have full width half maximum or
00:01:37;00 320 nanometer.
00:01:39;05 So that doesn't seem to be able to improve our resolution, but we also know that
00:01:44;09 Given even a peak as broad as Mount Everest as long as we know the profile of the peak, we can fit a profile.
00:01:53;09 We can get the center position.
00:01:55;05 And that we can do very precisely. It's the same case for single molecule peaks as long as we have only one molecule.
00:02:03;19 I'm going to explain why we can do that so precisely.
00:02:07;27 We know that
00:02:09;18 our camera just keeps detecting photons -fluorescent photons - coming from that molecule, and when every single photon
00:02:17;08 Hitting the pixel the camera is essentially recording the position of that photon.
00:02:21;23 And the error of
00:02:24;15 Deriving the molecule position from a photon position is
00:02:28;27 exactly our points spread function or
00:02:30;11 represents the Diffraction limit.
00:02:33;27 A single molecule image is going to be made up of more than one
00:02:38;05 photon and can be 10 photons, 100 photons, or a thousand photons, and this is equivalent to
00:02:46;04 Measuring the single molecule position 10 times, 100 times, a thousand times. In the end,
00:02:51;13 we know that given the error of the mean,
00:02:55;24 the localization precision improves as
00:02:58;17 the square root of number of photons, and
00:03:01;05 because we can collect a lot of photons from one molecule, we can get very high localization precision.
00:03:06;23 So that is how we can get diffraction limit resolution.
00:03:11;28 But that's not everything. In a real image,
00:03:14;12 we can have hundreds and thousands of molecules. In this case, there's no way we can do single molecule localization.
00:03:22;02 So a very important
00:03:25;14 procedure to get super resolution image to make single molecule localization microscopy method
00:03:30;27 Is to have fluorophores that we can control
00:03:33;26 whether it's in a fluorescent state or in a dark state.
00:03:36;05 Then these are fluorophores either as organic dyes or as fluorescent proteins.
00:03:42;25 So what we can do - we can at the beginning put them all in a dark state and
00:03:46;07 these fluorophores can be turned into the fluorescent state by light so we can give a very very weak
00:03:54;22 activation light and then only a very small fraction of these fluorophores will get into the fluorescent state.
00:04:01;07 Now we have a sparse subset of the single molecules. We can do our single molecule localization and get a position.
00:04:09;02 And we can then turn them off either by off switching or bleaching and
00:04:14;09 turn on another sub-fraction of these molecules. We just let this process go and we'll start to accumulate
00:04:19;01 molecule positions, and we can then use these single molecule positions to reconstruct a high-resolution image.
00:04:26;12 So this method has been independently developed in three different groups and
00:04:32;28 given three different names like STORM, PALM, and
00:04:37;00 FPALM, and these are basically the same methods. And now you can see even more names, but they are all following the same principle.
00:04:45;25 So I have explained to you some of the basics of how we can do super resolution microscopy by single molecule switching and single molecule localization.
00:04:54;01 So one example shown here is
00:04:56;20 microtubules in a mammalian cell and just immunostained by antibody using a
00:05:01;13 Alexa 647 fluorophore which is photo-switchable under certain condition.
00:05:08;02 So we do the photo-switching and localization. We can store an image. This is reconstructed from a total of 40,000 frames and
00:05:16;09 3.4 million localization points.
00:05:18;08 And from a zoomed-in image, you can see
00:05:22;00 the improvement of our resolution so that in a very dense region what conventional force microscopy is not showing much detail,
00:05:28;11 we are still able to resolve every individual microtubules and
00:05:33;03 We can also quantify our localization precision in this image by counting these
00:05:40;01 scattered individual clusters, which will represent not only bound secondary anybodies and
00:05:44;09 the dispersion of this
00:05:48;14 point gave a full width half maximum of 24 nanometers or standard deviation of 10 nanometers. That's more than an order magnitude improvement
00:05:56;10 over the 320 nanometer full width half maximum of the diffraction limit.
00:06:02;10 So this is basically how we can get STORM image, and one thing is
00:06:08;04 the series structures are all in three dimension, so we need to think about a 3D imaging method.
00:06:15;09 For 2D imaging, what we do is we have a fluorophore in a cell and
00:06:20;07 we image in a camera.
00:06:23;03 We do the localization. We get an XY coordinate that reconstructs to the image.
00:06:27;14 For 3D imaging, we need to get a Z coordinate in addition to the XY.
00:06:33;28 And fortunately there are a number of single molecule 3D localization methods that is already developed that we can use.
00:06:40;18 One of the simplest way is just to use the shape of single molecule spot itself.
00:06:45;03 We know that when the single molecule body is in focus,
00:06:48;27 we see nice and sharp. When it's out of focus,
00:06:51;19 then it got blurry, and then using how blurry it is, we can tell how far away it is from the focal plane.
00:06:57;06 But there is a problem. First, we cannot tell whether it's above or below the focal plane, and second
00:07:05;24 when the mark is out of the focal plane, this is the case when this method is the least sensitive.
00:07:12;23 So one method of doing single molecule 3D localization is to introduce a
00:07:18;16 cylindrical lens in the imaging optic path, and that
00:07:22;03 gets some aberrations in the image, and basically the X and the Y direction is not in focus at the same time.
00:07:27;03 In this case the Y is in focus, the X is out of focus, so you see an individual shape in the single molecule spot.
00:07:35;00 That's elongated in the X direction.
00:07:36;15 Depending on the Z position of this molecule, both X and Y can be a little bit out of focus,
00:07:41;09 so it is round, or X can come into focus.
00:07:45;15 So then we encode the Z position in the shape of the single molecule spot.
00:07:51;02 And we can still determine the XY position from the center. So here is one example.
00:07:56;26 We have blinking single molecules, and we scan a stage from below the focal plane to a bottom focal plane.
00:08:02;23 You can clearly see the shape change.
00:08:05;09 And
00:08:06;18 one example of 3D imaging again microtubule
00:08:11;03 network and this case we not only have
00:08:16;12 resolved every single microtubule, and now the color encodes the Z position from this dual-linked image.
00:08:22;08 You can see that we are resolving these two layers of microtubules
00:08:27;03 that's been separated by a distance of about 500 nanometers, which is not resolvable by confocal or two-photon microscopy.
00:08:34;16 In addition, we know that to XY which we have 20 to 30 nanometer resolution
00:08:42;29 in the Z, we also have 50 to 60
00:08:44;10 localization precision in all three dimensions that is an order of magnitude improvement over conventional fluorescent microscopy.
00:08:52;27 Besides this astigmatic imaging method, there are many other single molecule localization methods that we use.
00:09:00;07 For example, by imaging in two different focal planes so that
00:09:04;07 either of the two focal planes are out of focus at a given Z position or by
00:09:10;02 engineering the points spread function shape, for example, this work done by this group
00:09:14;02 introduced a double critical point spread function so that one molecule appears as a pair of points whose
00:09:21;18 whose readied angle depends on the Z position.
00:09:25;03 And the most precise version method has been using two objectives - two opposing objectives - and
00:09:32;14 using interference of forces that are collected from these two objectives to determine the Z position, and that has
00:09:40;29 led to a Z resolution or Z localization precision that's even better than the XY localization precision.
00:09:50;26 So that's how we can get 3D localization method and 3D images.
00:09:57;03 One thing you understand that the key for single molecule
00:10:03;23 switching based super resolution microscopy method is
00:10:05;04 photoswitchable fluorophores and that may sound something very intimidating, but in fact a lot of
00:10:14;21 fluorescent dyes and fluorescent proteins that we are using in the lab has been discovered to be photoswitchable. This includes
00:10:22;19 the red and the far-red cyanine dyes discovered by
00:10:26;18 photoswitchable property discovered by this group and this lab in 2005.
00:10:33;07 These people have done more
00:10:37;10 screening and found that a lot of the common dyes
00:10:41;18 spanning all the way from blue to far red and near near infrared has the photoswitchable property once you have a
00:10:49;01 reducing environment.
00:10:50;14 And
00:10:52;12 another big family of photoswitchable fluorescent probes will be the photoswitchable fluorescent proteins,
00:10:59;03 and that goes back as
00:11:01;15 early as '97 when this person discovered that eYFP is photoswitchable, and
00:11:06;18 recently there has been a lot of them coming out almost one every two months.
00:11:14;01 I'm telling you one example of this photo switchable dyes
00:11:18;07 Red Dye Cy5 or an Alexa 647 - basically, they share the same chromophore structure.
00:11:23;10 These are very good dyes. That means if you excite it with red light, the linked image
00:11:29;01 extremely strong fluorescence captures single molecule images, and
00:11:32;29 when there's a thiol in a buffer,
00:11:36;26 the red light will drive a photochemical reaction between the thiol and the dye, and
00:11:41;17 that will change the chemical structure of the dye and make it non-fluorescent.
00:11:46;06 By exciting the non-fluorescent dye, the dark dye, with either UV light or
00:11:53;24 extremely strong red light, this will reverse the reaction and make it fluorescent again.
00:11:59;10 In this case, the red light drives both off switching and on switching, so if you put the red light on here
00:12:06;04 you can see blinking.
00:12:08;12 And because the blinking of individual molecules are independent, this kind of temporarily separates the single molecules
00:12:14;23 images of different dyes. We can use even that to do super resolution microscopy.
00:12:20;11 For example, you can label microtubules in a cell
00:12:23;02 using a commercial Alexa 647 labeled secondary antibody. Do the photoswitching and the localization. Now we get our super resolution image.
00:12:32;03 And from the zoomed-in image, you can also see the resolution
00:12:36;27 improvement. Now we have so many dyes that we can use. This will allow us to do multi-color imaging, and that
00:12:44;02 basically enables us to study the interaction of three structures and
00:12:49;23 molecules inside a cell.
00:12:52;23 And to do multi-color imaging, one of the very straightforward way would be to use two different fluorophores.
00:12:58;20 Say, in this case, for example, we'll use a fluorescent dye Alexa 647 and a fluorescent protein
00:13:06;09 mEosFP2. They have different excitation wavelength and different emission wavelengths, so we can
00:13:13;26 excite them at the same time using two lasers and
00:13:18;04 separate emission. Here's some raw image. You can see the blinking of Alexa 647
00:13:23;02 as well as the blinking of the fluorescent protein mEOSFP2. Then we can do the localization individually and align them.
00:13:30;23 That is a two-color image of microtubules in the cell labeled with both fluorescent protein and
00:13:38;09 secondary anybodies, and here, we can
00:13:40;26 compare the same structure image with two different probes which
00:13:46;06 Which I will discuss in more detail later on several slides later.
00:13:50;07 So this is one way of doing multi-color imaging.
00:13:54;09 The photo switchable red family of dyes in particular allows a different way of doing multi-color images.
00:14:00;23 Let's come back to the photoswitching mechanism Cy5. We know that the red laser drives the off-switching and
00:14:07;10 UV as well as red drives the on-switching.
00:14:12;19 Now if
00:14:13;05 Cy5 has another fluorophore nearby, in this case Cy3,
00:14:18;00 we can drive the on-switching by exciting Cy3 with a green laser.
00:14:23;18 Here's one example.
00:14:26;08 Cy5 single molecules on the surface again, and
00:14:29;07 turn on the red, they switch off. And with every flash of green light, it turns back on.
00:14:37;21 And the Cy3, in this case, we call it an activator fluorophore
00:14:41;03 determines another wavelength that we can use for activation, and
00:14:47;05 here is another experiment for example.
00:14:51;10 We try to activate this dye here with three different lasers - green, blue, and violet.
00:14:57;24 The Cy3 and Cy5 here only responds to the green laser because that's where Cy3 absorbs; if we pair it with Cy2,
00:15:04;01 then it responds to the blue laser, and
00:15:08;22 Alexa-Cy5 pair will only respond to the violet 405 nanometer laser.
00:15:16;03 That allows us to
00:15:17;28 distinguish different dye pairs using the activation wavelength; in this case, we use an alternating
00:15:25;00 sequence of two activation lasers for dyes that turned on just after the activation is of house
00:15:32;02 we can assign the color to the localization point to it, and
00:15:34;28 that allows us to do multi-color imaging. For example, in this case, while imaging microtubules together with clathrin-coated pits.
00:15:42;00 In a conventional fluorescent image, you can see some of them are kind of overlapped in the image, but with increased resolution now
00:15:50;28 you can see the two structures that definitely separated.
00:15:53;07 So we have discussed that these two different multi-color imaging methods - one
00:15:58;19 using different emission wavelengths and one uses different activation wavelengths.
00:16:03;20 The advantage of using different emission wavelengths] to distinguish fluorophores is that you can use simple
00:16:12;02 fluorophores instead of dye pairs and
00:16:13;29 it has very low crosstalk.
00:16:15;24 The activation method has crosstalk because the red laser can also activate the fluorophores.
00:16:23;18 And the other advantage is that you can just turn on the laser and collect the image continuously;
00:16:29;23 whereas, if you want to use different activation wavelength, you have to have a shutter laser sequence.
00:16:34;04 To the advantage of the activation wavelength method, well first
00:16:39;29 for different channels, you are simply imaging exactly the same fluorophore. That simplifies the detection optics and
00:16:47;16 there's no image alignment required.
00:16:52;09 For the different emission wavelength method and
00:16:55;14 because to compensate for the chromatic aberration up to nanometer precision, that's not a really easy task.
00:17:05;11 So we've been talking [about] the advantages of super resolution microscopy, and
00:17:09;02 Well is there any limit of what we call super resolution?
00:17:15;25 Here comes back to our localization precision formula.
00:17:18;00 We have our improvement over our diffraction limited resolution, and this improvement factor is
00:17:25;18 roughly the square root of number of photons we can collect from the molecule.
00:17:30;16 And for our
00:17:31;01 Red cyanine dyes is so far the brightest one,
00:17:33;19 we can collect 6000 photons in one photoswitching cycle, and that should give us about five nanometer
00:17:43;07 theoretical localization precision, and this is when the Cy5 is photoswitching.
00:17:48;08 If you consider all the photons that we can collect from this fluorophore,
00:17:52;20 it goes easily to 100,000,
00:17:57;08 and that's the one nanometer.
00:17:57;20 So this sounds
00:17:59;12 extremely impressive,
00:18:01;14 but this is just our localization precision, and for practice, there's a lot of limitations.
00:18:09;16 One limitation is the size of the fluorescent probe itself.
00:18:13;28 A lot of the images I showed you just now are using immunofluorescence, and
00:18:18;06 the antibody which has a size of about ten nanometers; that is nothing in conventional fluorescent microscopy.
00:18:26;06 But here 10 nanometers is already comparable to our resolution,
00:18:28;28 especially considering if we use primary and secondary antibody for indirect immunofluorescence.
00:18:34;22 For example, here is the domain of the
00:18:38;12 microtubule images that I showed you just now, and if we measure the width of
00:18:44;14 microtubule, it's 58 nanometer instead of the known 25 nanometer width of the
00:18:50;27 microtubules,
00:18:52;27 so the extra 33 nanometer comes from these two measures of
00:18:56;17 antibodies. As a comparison, if I use fluorescent proteins,
00:19:00;23 and that is a much smaller probe, and here as I said
00:19:04;25 it's the microtubules at the same time labeled with fluorescent proteins.
00:19:11;17 If we measure width this time, it's 43 nanometer - definitely narrower compared to antibody, and that is because
00:19:20;06 the size the probe is much smaller.
00:19:21;03 But disadvantage for fluorescent proteins is that it gives out much fewer photons
00:19:26;19 in typically less than 1000 photons per square per photoactivation event, so if you look at the images, the
00:19:34;00 antibody staning, microtubules have a fairly sharp boundary whether it's the fluorescent protein image is a little blurry because the new localization
00:19:39;23 precision is not as good as antibody staining.
00:19:44;20 Overall, if we compare fluorescent protein versus antibody super resolution microscopy, the difference is
00:19:51;28 almost the same as in conventional fluorescent microscopy. Fluorescent protein is very
00:19:57;04 useful for live sample labeling. It has very high specificity, very high labeling efficiency, and
00:20:04;16 you can label it by genetic encoding.
00:20:07;25 This is both to the advantage and disadvantage because if you want to detect in the endogenous protein,
00:20:16;23 then fluorescent protein fusion method is not the good enough approach.
00:20:21;21 And to the advantage of the antibody immunofluorescent method, it can have very high signal that leads to very high
00:20:28;04 localization precision.
00:20:31;11 And it
00:20:33;01 also contains much more colors compared to the limited palette of photoactivated fluorescent proteins, so it's more advantageous for
00:20:40;15 multi-colored imaging. Here we talk about one limitation of the
00:20:44;16 effective resolution - the probe.
00:20:46;20 There is another limitation.
00:20:49;08 So here you know we collected our microtubule images for a total of forty thousand frames.
00:20:55;04 If I'm not using the entire 40,000 frame movie to reconstruct an image,
00:21:00;14 we can get we can have fewer points. We can do it with two hundred frames, five hundred frames,
00:21:05;03 one thousand, five thousand, always the full forty thousand movie. In this case, you can see that
00:21:12;15 you don't really resolve all the microtubules until you have five hundred frames.
00:21:17;23 In the same cell where microtubules are much denser, here
00:21:22;01 you can see that you really need to go to five thousand frames to distinguish individual microtubules.
00:21:29;01 So it's the same localization precision, but the capability to resolve structures
00:21:34;06 is really connected to the density of molecules, and
00:21:39;16 that can be simply explained by the Nyquist criteria.
00:21:43;05 So suppose we have some line-like structures in the cell, and
00:21:48;17 if our sampling density is not there, we really cannot say that okay, we have two lines.
00:21:55;18 It's only when the point-to-point distance is
00:21:59;08 comparable to one half of the feature size or barely smaller than 1/2 a feature size. Now we can reliably
00:22:06;09 resolve the structure, and
00:22:07;25 it is best
00:22:10;24 understandable by this single molecule localization type of super resolution microscopy method, but in fact because
00:22:15;17 for fluorescent microscopy, we all use discreet fluorophore labeling, so this labeling density limit of resolution
00:22:23;19 applies to all fluorscent microscopy methods.
00:22:26;07 It's just, for example, for confocal microscopy is
00:22:29;12 not easy turn out to be
00:22:31;27 to be the limiting factor because the optical resolution wasn't there.
00:22:39;06 And this density limited of resolution matters a lot if you want to do
00:22:45;21 time-resolved live-cell imaging because
00:22:48;09 the longer the integration time is, the more points you can collect.
00:22:53;04 Okay, for live-cell imaging in fact it's not that difficult,
00:22:59;16 so
00:23:01;17 we know
00:23:03;01 in collecting the data for super resolution microscopy,
00:23:06;08 we simply collect a very very very long movie, and
00:23:10;20 if we do single molecule localization in the entire movie and stack them all together,
00:23:15;27 we get our super resolution image. If we're not doing that,
00:23:20;00 instead we divide this very low movie into shorter time steps. For each time step,
00:23:27;11 we can still reconstruct a super resolution image, and then
00:23:31;10 by playing this time step, we can play our super resolution movie. So here's one example and again
00:23:41;17 microtubules in live drosophila S2 cells labeled with photoswitchable fluorescent protein mEos2, and this is a conventional fluorescent image.
00:23:48;20 If we stack all the localization points together,
00:23:50;09 we got our super resolution image.
00:23:52;09 And we can divide this into time steps, and to get a movie, in this case, each time step is
00:24:01;07 1200 frames per step.
00:24:03;06 We are acquiring at 60 frames per second and this gives us 20 second time resolution,
00:24:10;05 so 20 second time resolution is
00:24:14;16 kind of able to study some of live cell behavior, but it's not quite sufficient.
00:24:19;20 But what's limiting this time resolution. Let's do some very simple calculation, and
00:24:26;22 so here's our single molecule image full width half maximum 320 nanometer, and
00:24:34;12 let's play safe. We assume that one molecule is going to occupy this
00:24:39;07 500 x 500 nanometer size box, and
00:24:44;21 we don't want density to be too high because if it is as high as this, you cannot do single
00:24:49;23 molecule localization, and because the switching is completely random,
00:24:56;01 we want to
00:24:57;05 minimize the probability of two molecule overlap, so in practice
00:25:01;17 we can have on average 0.1 molecules switched out in this
00:25:07;16 0.25 micrometer squared box in every camera frame.
00:25:10;29 Then we can do the calculation.
00:25:15;00 If we want a
00:25:17;09 70 nanometer
00:25:19;22 density limit resolution, that means 35 nanometer point-to-point distance.
00:25:23;02 That will need 2,000 frames to get enough for it,
00:25:28;26 and 2,000 frames if we are acquiring at hundred frames per second that's exactly 20 second time resolution.
00:25:37;21 And if we want to do it faster,
00:25:41;09 there are two ways we can do: one is to increase the camera frame rate, which recently John's group has shown.
00:25:47;27 if to acquire camera images at a thousand frames per second, and that
00:25:52;18 Improves the time resolution a lot.
00:25:54;00 And another way is if we can develop
00:25:57;19 algorithm that can still identify single molecules out of this very very densely overlapped fluorophore images, and that can also
00:26:05;11 improve the time resolution
00:26:09;09
00:26:09;22 as has been shown by some of the more recent studies including our own work.
00:26:16;05 So that's about
00:26:16;18 live-cell imaging and limitations of live-cell imaging. There's inherent
00:26:21;29 spatial-temporal resolution trade-off, and I would like to end this lecture by showing
00:26:27;05 some of the images that we have taken -
00:26:31;08 two-color 3D imaging of mitochondria and microtubules of clathrin-coated pit,
00:26:35;26 and F-BAR domain protein binding the neck on the underneath the pit, and our imaging of
00:26:42;01 synapses in mouse brain sections.

This Talk
Speaker: Bo Huang
Audience:
  • Researcher
Recorded: April 2012
More Talks in Microscopy Series
  • Super-Resolution: Structured Illumination Microscopy
    Super-Resolution: Structured Illumination Microscopy (SIM)
  • Jennifer Lippincott-Schwartz
    Measuring Dynamics: Photobleaching and Photoactivation
  • Microscopy: Quantitative Analysis of Speckle Microscopy: Clare Waterman
    Measuring Dynamics: Fluorescent Speckle Microscopy
All Talks in Microscopy Series
Share

Talk Overview

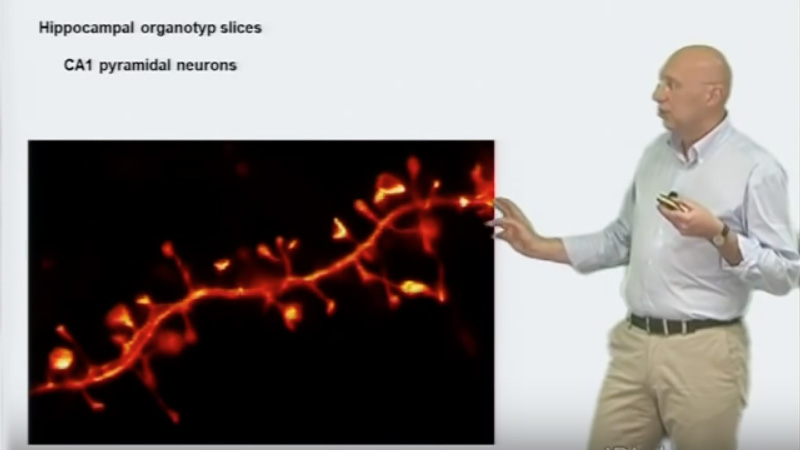
A large family of techniques to achieve super-resolution imaging utilize single molecule switching and localization microscopy. In these techniques, such as STORM, PALM, FPALM, and GSDIM, super-resolution is achieved by first switching all the molecules in the sample to a non-fluorescent state. Individual molecules are then returned to the fluorescent state, imaged, and their position determined to much higher than the diffraction limit. In this talk titled “Super-Resolution: Localization Microscopy,” Bo Huang describes these techniques, dye requirements (photoswitchable fluorescent proteins and small molecule dyes) and how to extend these techniques to 3-dimensional imaging.

Questions

  1. When localizing a single molecule, what parameter controls the improvement beyond the diffraction limit?
    1. The number of photons collected
    2. The pixel size of the camera
    3. The acquisition frame rate
    4. The objective magnification
  2. Localization microscopy relies on what other technique to construct an image?
    1. Stimulated Emission
    2. Single Molecule Switching
    3. Structured illumination
    4. Confocal Microscopy
  3. Which of the following influence the final resolution of a single molecule switching image?
    1. The number of photons collected
    2. The method used to label the sample
    3. The number of points recorded
    4. All of the above
  4. Which two parameters do you have to trade off when doing live cell single molecule localization microscopy?
    1. Localization Precision and Speed
    2. Wavelength and Speed
    3. Resolution and Speed
    4. Phototoxicity and Speed

Answers

View Answers
  1. A
  2. B
  3. D
  4. A

Speaker Bio

Bo Huang

Bo Huang

Dr. Huang’s research focuses on using super-resolution microscopy and single-molecule imaging to understand how proteins form large complexes and how proteins interact to regulate signaling. Huang is an Assistant Professor in Pharmaceutical Chemistry and in Biochemistry and Biophysics at UC San Francisco. Continue Reading

Playlist: Microscopy Series

  • Stefan Hell
    Overview and Stimulated Emission Depletion (STED) Microscopy
  • Super-Resolution: Structured Illumination Microscopy
    Super-Resolution: Structured Illumination Microscopy (SIM)
  • Jennifer Lippincott-Schwartz
    Measuring Dynamics: Photobleaching and Photoactivation
  • Microscopy: Quantitative Analysis of Speckle Microscopy: Clare Waterman
    Measuring Dynamics: Fluorescent Speckle Microscopy

Reader Interactions

Leave a Reply Cancel reply

Your email address will not be published. Required fields are marked *

Primary Sidebar

Like our Website?

You'll love our newsletter...

  • Sign up for:
    • Exclusive iBiology content
    • 10 Must See Biology Videos
    • Talks by 20+ Nobel Winners
    • Our young Scientist Survival Toolkit
    • Talks by trailblazing Women in Biology
    • Updates on exciting iBiology projects in development
    Tyler Allen
  • This field is for validation purposes and should be left unchanged.

Privacy Policy

Help us keep bringing the world’s best biology to you!

Footer

Funders

National Science Foundation: NSF
Lasker Foundation
NIGMS

Partners

EMBL
EMBO
HHMI
NRMN
UCSF

Start Here

  • Talks for Everyone
  • Talks for Students
  • Talks for Research
  • Talks for Educators

Explore

  • Explore
  • All Playlists
  • All Speakers
  • All Talks

Talks By Topic

  • Biochemistry
  • Bioengineering
  • Biophysics
  • Cell Biology
  • Development and Stem Cells
  • Ecology
  • Genetics and Gene Regulation
  • Human Disease
  • Immunology
  • Microbiology
  • Neuroscience
  • Plant Biology
  • Techniques

Talks by Series

  • Bench to Bedside
  • Famous Discoveries
  • Great Questions
  • Share Your Research Series

Career

  • Professional Development
  • Career Exploration
  • NRMN Resources
  • Biomedical Workforce

Courses

  • Microscopy Series
  • Short Microscopy Series
  • Open edX Courses
  • Cell Biology Flipped Course
  • Engineering Life Flipped Course
  • Evolution Flipped Course

Educator

  • Educator Registration
  • Educator Resources
  • Log In

About Us

  • About Us
  • iBiology Team
  • Wonder Collaborative
  • Contact Us
  • Mission
  • Privacy Policy
  • SCL Financial Conflict of Interest Policy

This material is based upon work supported by the National Science Foundation and the National Institute of General Medical Sciences under Grant No. 2122350 and 1 R25 GM139147. Any opinion, finding, conclusion, or recommendation expressed in these videos are solely those of the speakers and do not necessarily represent the views of the Science Communication Lab/iBiology, the National Science Foundation, the National Institutes of Health, or other Science Communication Lab funders.

© 2022 - 2006 iBiology · All content under CC BY-NC-ND 3.0 license · Privacy Policy · Terms of Use · Usage Policy
 

Power by iBiology