• Skip to primary navigation
  • Skip to main content
  • Skip to primary sidebar
  • Skip to footer

iBiology

Bringing the World's Best Biology to You

  • Start Here
    • Explore iBiology
    • All Playlists
    • All Speakers
    • All Talks
    • What’s new at iBiology?
  • Research Talks
    • Talks by Topic
      • Biochemistry
      • Bioengineering
      • Biophysics
      • Cell Biology
      • Development and Stem Cells
      • Ecology
      • Evolution
      • Genetics and Gene Regulation
      • Human Disease
      • Immunology
      • Microbiology
      • Neuroscience
      • Plant Biology
      • Techniques
      • Archive
    • Talks by Series
      • Bench to Bedside
      • Famous Discoveries
      • Great Unanswered Questions
      • Microscopy Series
      • Young Scientist Series
  • Stories
    • Background to Breakthrough
    • Interviews and Profiles
    • Science and Society
  • Courses
  • Careers
    • Professional Development Talks
    • Professional Development Courses
    • Career Exploration
    • NRMN Resources
    • Biomedical Workforce
  • Educators
  • About
    • Mission
    • iBiology Team
    • Board of Directors
    • Make a Donation
    • iBiology Funders and Partnerships
    • Contact Us
  • Donate
Home » Courses » Microscopy Series » Fluorescence Microscopy

Demystifying Microscopes: Disassembling an ASI RAMM Microscope

  • Duration: 18:12
  • Downloads
    • Hi-Res
    • Low-Res
  • Subtitles
    • English
  • Transcript

00:00:11.28 Today, I want to show you the inner workings of a microscope.
00:00:16.27 To do so, I have this kind of interesting looking microscope.
00:00:21.20 And it's interesting because one thing that we usually associate with
00:00:26.27 microscopes is missing, and that is eyepieces. So this system
00:00:31.00 is, in a way, torn down to its bare essentials. There's
00:00:36.13 just an objective lens and we'll get to that soon, and an
00:00:40.01 image is formed on the camera here. And that is then displayed
00:00:44.04 only on the computer. Now other than that, it has all of the
00:00:49.26 components that a microscope needs, that is basically an
00:00:54.11 objective lens and a tube lens, and some source of illumination
00:01:00.12 light. And I will now take you through where these things
00:01:04.07 are and how they work. But then to do so, we first need to
00:01:08.23 -- before taking apart the microscope, we first need to convince
00:01:12.20 ourselves that it actually works and that we can use it as a
00:01:16.16 scope. So, first of all, we can see on the screen that there
00:01:22.07 is a live image. There we go. And I can then use the joystick
00:01:30.05 here to actually move the stage and it moves the sample.
00:01:36.21 So, we have a motorized stage, an xy stage here. On top of that,
00:01:43.19 there's also a motor here that moves the objective.
00:01:47.16 And that's then controlled with this wheel here. And that
00:01:50.25 can go up and down, and that will change the focus of the
00:01:55.19 sample on the screen, because it moves the objective with
00:02:00.12 respect to the sample. Then this part here is the condenser
00:02:08.27 part of the microscope. So we can set up Kohler illumination
00:02:14.24 just as you've learned before. There's a light source here,
00:02:19.11 which is an LED. And we'll get to that in a moment. There
00:02:24.04 is then a field diaphragm here. And when we close that, we
00:02:29.14 see that the light on our sample gets a lot dimmer. And
00:02:34.06 there's the condenser aperture down here. We can focus the condenser.
00:02:40.06 And so, using all of these, we can then set up Kohler illumination.
00:02:46.27 So we'll close down the field diaphragm, we'll find the
00:02:55.27 point where the field diaphragm is focused onto the sample,
00:03:01.04 which is right here. And then there's some controls here where
00:03:05.07 with which we can move the condenser in this direction and in this
00:03:10.05 direction. So there's here, we can move this one and we see
00:03:13.29 that the field diaphragm is moving. And we also see that
00:03:17.23 it's kind of moving in unexpected ways, occasionally. And
00:03:22.01 this way, we can center that and then can open it slightly
00:03:26.16 so that it covers the full field of view. So here we would've set up
00:03:30.27 Kohler illumination. Now it is interesting to see how this whole
00:03:35.24 thing works, and the nice thing is that we can take it apart.
00:03:39.06 So, first thing I'll do is disconnect the light source here
00:03:43.18 by pulling out the power supply. We can then take this
00:03:50.08 whole condenser and take it off the microscope. There's the
00:03:59.09 field diaphragm, the condenser diaphragm, there is a slider here
00:04:06.10 in between the condenser diaphragm and the actual condenser
00:04:10.23 lens. And this slider has a neutral density filter, a D filter,
00:04:16.26 open position, and another aperture. Put that back in.
00:04:24.17 So when we look at the light coming out of the condenser, you can
00:04:29.17 see kind of this cone of light coming out. So when you now
00:04:38.04 close down the field diaphragm, you will notice that that
00:04:43.21 cone of light is still there, but that the center point is much
00:04:49.05 smaller than it was before. So we close that down in the
00:04:54.05 point of view. Whereas when you close down the condenser
00:05:00.23 diaphragm, we kind of get this small cone of light. So the angles
00:05:10.24 with which we illuminate are now much, much shallower.
00:05:14.05 Okay, so now we'll take off the light source itself. So the first thing
00:05:32.22 we see here now is the way all the connections are made
00:05:35.26 in this microscope. So there's this ring here, I can also, loosen
00:05:40.07 three set screws on the other side, so you see that this ring
00:05:51.06 is what holds everything together. So it fits in the tube nicely.
00:05:57.14 And then 3 set screws hold it firmly in place, and make sure that
00:06:03.14 all the components are all in the same optical path.
00:06:07.23 Okay, so we took out here the light source, the LED,
00:06:13.05 with the field diaphragm. And you can now see that
00:06:17.02 diaphragm itself. So I close it and open it, and behind it
00:06:23.11 you can also see the reflections of the collector lens.
00:06:27.27 So that collector lens actually collects the image of the LED, and
00:06:34.14 then projects that image roughly at the condenser aperture.
00:06:42.15 So we can actually see that by lighting the LED again.
00:06:49.00 And you can now see that there's a focus roughly at this
00:06:58.05 distance, so that is roughly where that condenser aperture sits.
00:07:01.24 Now, we can take this even further apart. So by unscrewing
00:07:12.10 these two screws, we take out the top part and we see that this light source
00:07:20.22 is literally a little circuit board with a USB connector on the side for
00:07:26.15 power, and then the LED sitting right there.
00:07:36.26 Okay, so that was the transmitted light. So this microscope
00:07:44.18 is not only equipped for transmitted light microscopy, but also for
00:07:48.07 fluorescence. And to demonstrate that, I'll put on another sample.
00:07:55.22 Something that has some fluorescent object. And we will now
00:08:02.02 also need to connect the fluorescent epi light source.
00:08:08.13 Which is in the back here. So, I'll power that up, you may be able to see
00:08:18.26 blue light coming out now. I will move the microscope by the
00:08:27.04 stage, so that we are now close to the sample. I now also need
00:08:31.26 to cover up the sample, so that we don't get overhead light
00:08:39.29 coming through anymore. And we will need to have a slightly higher
00:08:44.00 exposure time. And then we start to see something on the
00:08:48.04 screen, and I'll now try to focus. And there we see nicely
00:08:56.08 fluorescent cells. So here, we have a fluorescent microscope.
00:09:05.13 So how does that work? And what are the basic parts of it?
00:09:10.19 Well, so, we have exactly the same LED illuminator that is now sitting
00:09:21.26 in the back here. So it's sitting behind the cube, and it
00:09:32.26 shines its light onto a fluorescent cube that is discussed elsewhere
00:09:39.15 in this course, that I can easily take out. We have here a
00:09:47.01 cube, there's blue light shining in from the LED, there's a
00:09:51.14 dichroic mirror sitting here in the middle that shines the light up through the
00:09:56.05 light path. The fluorescence travels back past the fluoro dichroic
00:10:00.08 mirror and goes on this way to the camera. So that is the dichroic
00:10:08.10 mirror. So we're still missing quite a bit of parts that we have not inspected
00:10:14.03 yet. And first of all, there's the objective lens itself. So I'll try to
00:10:20.10 uncover that now. So to do so, I'll first take this stage
00:10:26.17 out of the way. So this is the motorized xy stage. And I will need to
00:10:33.23 position it such that I can unscrew it. Okay, so I'll start now with
00:10:40.23 taking out the stage insert. So this is where you normally put your slide in.
00:10:46.17 And I'll first take the objective off. The plan is take this stage off,
00:10:54.20 but I really don't want to risk hitting that objective. So maybe a little
00:10:58.17 hard to see, but the objective is simply screwed in here.
00:11:05.05 And we can then see that this is a Nikon objective lens, and
00:11:11.24 we could put in any other Nikon lenses or actually any other
00:11:16.05 lens with a compatible thread. So I'll put that lens away in a
00:11:23.28 safe place right now so that it doesn't get damaged by accident.
00:11:29.06 Objective lenses are a very expensive part of the microscope,
00:11:37.08 and you want to be very careful with them. So we'll now
00:11:40.15 take off the stage and that is connected with 4 screws.
00:12:09.08 So, I'll move that out of the way here. So basically
00:12:22.11 the light will go down here, and here is a mirror-like objective
00:12:28.04 -- this is actually a prism so that it reflects all the light into
00:12:32.06 this direction. It really is uhm, it functions as a mirror.
00:12:39.07 I'll shine my flashlight through it so that you can see that
00:12:44.15 it is simply a mirror. We then have that fluorescent cube.
00:12:51.27 And here is a tube with the tube lens. And we can actually
00:12:58.01 also take that apart. So, let's first take the camera off here.
00:13:12.19 So the camera again, is connected to a ring that it will screw onto.
00:13:21.11 There's always a connection somehow to the computer, in this case,
00:13:24.18 it's firewire. Firewire is hot pluggable, but nevertheless, like switching this
00:13:30.23 thing off. So we take out this firewire cable, and now like most
00:13:37.04 cameras, you can then unscrew this from the microscope itself.
00:13:42.12 Doing this too often is not great because you always get a little
00:13:47.04 bit of metal scrapings that can then fall back on the CCD. So this
00:13:54.13 is what's called a C-mount, camera mount, and you can
00:13:59.06 see the gigantic chip in here. And here on the back we have the firewire
00:14:05.19 connector, the on/off switch, and some other connectors we
00:14:08.05 don't use here. Then the actual tube with the tube lens is
00:14:16.24 connected with, in this case, 4 set screws. But again, it is attached
00:14:21.16 to a ring here. And I'll loosen all four of them. I'll need to put these set
00:14:32.07 screws back in to be able to take the tube out. And so here we
00:14:43.24 have the tube. And when you look through that, you will see a lens
00:14:48.05 and this is the second most important lens in the microscope. This is the
00:14:52.07 tube lens that takes the image in infinity and then focuses it
00:14:57.09 on the CCD in this case. And what we then have left is the
00:15:07.01 dichroic cube. And the dichroic cube is hidden here behind,
00:15:12.07 so it can be easily replaced and fit exactly in the same position.
00:15:17.27 So the company made this construct here where the cube is
00:15:24.08 connected to the lid. Here the excitation light will come in from this side,
00:15:31.01 the mirror will then send it here, and the fluorescence comes back the other way.
00:15:37.26 And I'll demonstrate that in a second, but first, let's take off the
00:15:43.15 whole cube holder and the epifluorescent light source.
00:15:57.15 Okay, so here we have the fluorescent light source, in this case,
00:16:03.05 the LED. And the holder for the fluorescent cube. So I'll now
00:16:08.21 first light the LED by connecting the USB power source.
00:16:14.18 So we have the blue light coming out of the LED, and now we can
00:16:19.01 investigate what happens when we put this fluorescent cube
00:16:22.06 back in. So the cube, to remind you, has an excitation filter
00:16:27.17 here, there's the dichroic mirror here that we expect to
00:16:32.03 reflect the blue light out, and then green fluorescence will pass through
00:16:37.07 this emission filter here. So now when we put the cube back in,
00:16:43.29 we see indeed, that the blue light is now reflecting this way.
00:16:52.24 And if we could shine white light back through it from this side,
00:16:58.25 you would be able to see that there's only green light coming
00:17:02.18 out in this direction. Now to demonstrate that emitted light,
00:17:07.16 I just use my weak little flashlight, and I hold that behind here.
00:17:13.00 So that now it acts as a fluorescent object, and you should be able to see
00:17:20.23 that there's green light coming through that emission filter.
00:17:24.21 Alright, so this is how this microscope works. And I think you
00:17:32.00 have seen all the different parts of it.

This Talk
Speaker: Nico Stuurman
Audience:
  • Researcher
Recorded: January 2013
More Talks in Microscopy Series
  • Optimizing Detection of GFP
  • Microscopy: Live Cell Imaging and Environmental Control (Kurt Thorn
    Live Cell Imaging and Environmental Control
  • Ron Vale
    Minimizing Damage from Fluorescence
All Talks in Microscopy Series
Share

Talk Overview

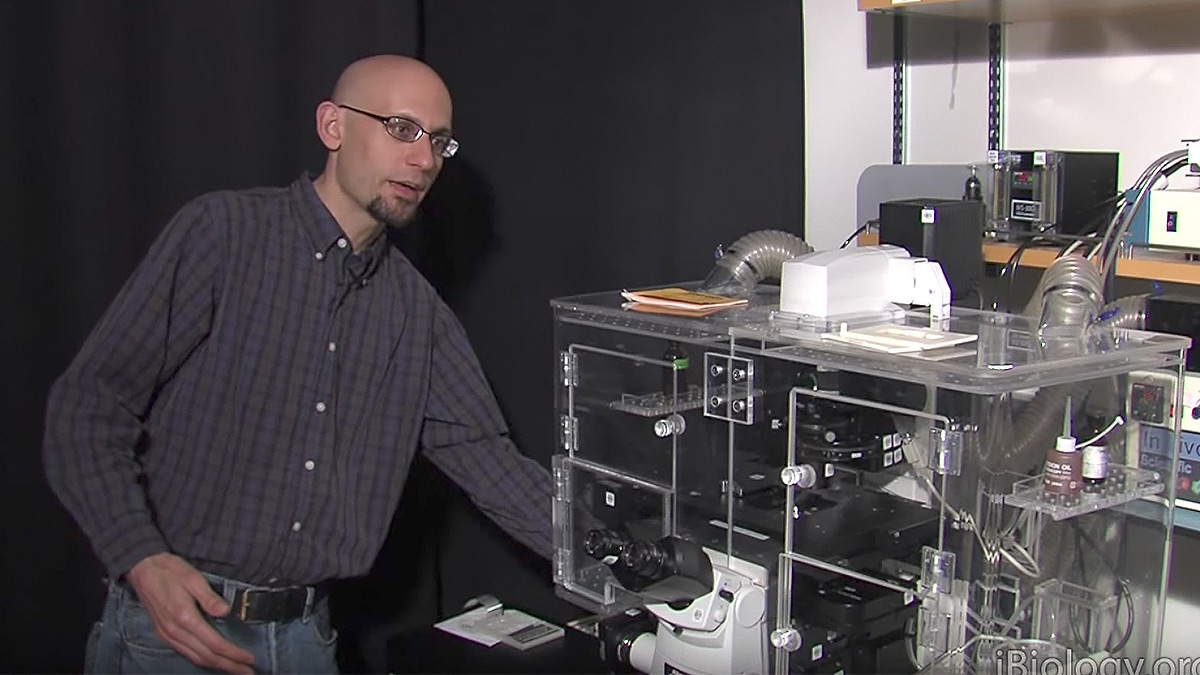
Taking apart a microscope helps you discover all the important optical components and get a better understanding of how things work. It is not always practical to do this yourself, therefore, have a look at this video to see the internals of the ASI RAMM microscope.

Questions

  1. What component is missing in this ASI microscope
    1. Condenser
    2. Eye Pieces
    3. Field Diaphragm
    4. Neutral density filters
  2. In this microscope, the illumination sources are:
    1. Lasers
    2. Metal halide lamps
    3. LEDs
    4. All of the above
  3. In the illumination path,
    1. The collector lens was adjusted to focus the light on the field diaphragm
    2. The condenser aperture is not present in this simple microscope
    3. A slider with neutral density filter is placed between the condenser diaphragm and condenser lens
    4. Adjusting the field diaphragm alters the cone angle of illumination.
  4. Which of the following statements is true:
    1. The tube lens is placed after the objective lens and before the fluorescence filter cube
    2. A prism (mirror) directs the trans-illuminating light to the camera port
    3. In this microscope, fluorescence is excited by trans-illumination from above and the excitation and emission light are separated by filters
    4. The tube lens is located within the camera C-mount

Answers

View Answers
  1. B
  2. C
  3. C
  4. B

Speaker Bio

Nico Stuurman

Nico Stuurman

Nico Stuurman is a Research Specialist at the University of California, San Francisco, in the lab of Ron Vale. Nico combines his expertise in computer programming and microscopy to advance many projects including the Open Source software, Micro-Manager. Continue Reading

Playlist: Microscopy Series

  • Disassembling a Nikon Ti Eclipse Stephen Ross
    Demystifying Microscopes: Disassembling a Nikon Ti Eclipse Microscope
  • Optimizing Detection of GFP
  • Microscopy: Live Cell Imaging and Environmental Control (Kurt Thorn
    Live Cell Imaging and Environmental Control
  • Ron Vale
    Minimizing Damage from Fluorescence

Reader Interactions

Leave a Reply Cancel reply

Your email address will not be published. Required fields are marked *

Primary Sidebar

Like our Website?

You'll love our newsletter...

  • Sign up for:
    • Exclusive iBiology content
    • 10 Must See Biology Videos
    • Talks by 20+ Nobel Winners
    • Our young Scientist Survival Toolkit
    • Talks by trailblazing Women in Biology
    • Updates on exciting iBiology projects in development
    Tyler Allen
  • This field is for validation purposes and should be left unchanged.

Privacy Policy

Help us keep bringing the world’s best biology to you!

Footer

Funders

NSF Logo
Lasker Logo
NIGMS Logo

Partners

Start Here

  • Talks for Everyone
  • Talks for Students
  • Talks for Research
  • Talks for Educators

Explore

  • Explore
  • All Playlists
  • All Speakers
  • All Talks

Talks By Topic

  • Biochemistry
  • Bioengineering
  • Biophysics
  • Cell Biology
  • Development and Stem Cells
  • Ecology
  • Genetics and Gene Regulation
  • Human Disease
  • Immunology
  • Microbiology
  • Neuroscience
  • Plant Biology
  • Techniques

Talks by Series

  • Bench to Bedside
  • Famous Discoveries
  • Great Questions
  • Share Your Research Series

Career

  • Professional Development
  • Career Exploration
  • NRMN Resources
  • Biomedical Workforce

Courses

  • Microscopy Series
  • Short Microscopy Series
  • Open edX Courses
  • Cell Biology Flipped Course
  • Engineering Life Flipped Course
  • Evolution Flipped Course

Educator

  • Educator Registration
  • Educator Resources
  • Log In

About Us

  • About Us
  • iBiology Team
  • Wonder Collaborative
  • Contact Us
  • Make a Donation
  • Mission
  • Privacy Policy

This material is based upon work supported by the National Science Foundation and the National Institute of General Medical Sciences under Grant No. MCB-1052331. Any opinion, finding, conclusion, or recommendation expressed in these videos are solely those of the speaker and do not necessarily represent the views of iBiology, the National Science Foundation, the National Institutes of Health, or other iBiology funders.

© 2021 - 2006 iBiology · All content under CC BY-NC-ND 3.0 license · Privacy Policy · Terms of Use · Usage Policy
 

Power by iBiology